And with spring comes chickens!
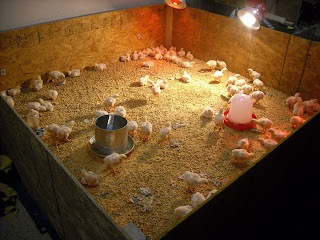
We've made progress on the brooder. You'll remember that the brooder is used to keep the chicks warm and safe for the first two weeks of their lives. It's an 8x8x2 pen. The whole structure is pretty simple really. It's 4x8 sheets of plywood separated into halves. We put a tarp underneath just to make the clean-up of the bedding a little easier and more sanitary. In our case, there are some raccoons that get in the barn so we've put a wire top over it...just in case. This size brooder will fit approximately 100 meat birds for about two weeks. After that, the birds get quite large and can jump the two foot wall.
 We keep them in the barn for warmth. You could put them outside, or in a lean-to, but remember that keeping them warm and dry is key. You'll need heat lamps no matter where you put the brooder and under no circumstances should they get wet. The lamps hang down close to the floor. It has to stay about 98 degrees for the newly hatched chicks to survive. Slowly the lights can be raised until, after a few days, they can be removed altogether. This is preparing them, slowly, to be taken outside for pasture. For bedding, we're using wood pellets that you would use for horse stalls. It doesn't mold and it’s very absorbent. We planned on using wood chips from a tree we're taking down, but it's just not happening right now. You want to be careful not to use sawdust, or any "dusty" sort of bedding. It gets into the respiratory system of the chicks. Even if they live, it will not allow them to thrive. Also, newspaper, though absorbent, it harder for the meat birds, or "broilers" because they slip on the surface potentially causing leg problems. The wood pellets are fairly inexpensive (about $7.00 for bag), but anything you can do free is much better. The feeder you use can be anything from a pie plate to a fancy automatic self-feeder or anything in-between. You can get pretty creative with this one. Think of things like lengths of gutter, wood troughs made from scraps, or old fashioned jar feeders. The material doesn't matter, but make sure you don't lose a lot of the feed. Also make sure the birds don't have to strain too high or too low when feeding. For the water, we've found that aluminum waterer's, available at your local feed store or the Tractor Supply store, work best. When in doubt, a pie plate, or similar item, will work just fine.
 When you build the structure, squaring up your handiwork is not necessary. Even a wood working novice, like myself (pictured on the left...not really doing anything), can put this structure together. No saw for cutting the boards? Lowes and Home Depot will typically cut them for you. I suspect your local lumberyard would do the same.
Here is a list of materials we use for building a brooder:
- Plywood
- Drill/Screwdrivers
- Hammer
- Screws
- Chicken staples
- Chain, cable, or rope (to hang lamps)
- Heat lamps
- Tarp
- Bedding
- Feeder
- Water source
- Chicken wire (depending on your location)
The sizes and quantities you need vary based on the size of your flock. Traditional breeds and layers often have somewhat different requirements. Talk with people in your area or search web for more information. I can't take credit for anything you see on this post. I shamelessly stole ideas from others who were already making a go of it. Why don't you do the same?
I would like to recommend that you purchase Poultry for Profits by Joel Salatin . The book was a big help to me along with the on-line community. Even if you don't plan to raise your own, it's important to be educated.
Any questions about our own practices? Just ask! We'd love to hear from you.

No comments:
Post a Comment